Having a generator is one of the wisest decisions you can make as it guarantees power during storms and other power outages. You have the choice between automatic generators that automatically come on whenever there’s a power outage, and manual ones which you turn on by yourself.
While automatic generators seem like a great idea, their costs may put off a lot of people. Even with that, the time it takes to turn on your generator is so short you’ll not be missing the power for too long. In our view, unless you run a very critical piece of equipment such as hospital respirators, life support machines and others, you don’t really need an automatic generator.
In this guide, well take you through the steps of starting a generator for the first time and other times after that. We also focus on the different methods of starting different generator brands with the major brands all being mentioned. In our expert view, turning on a generator is almost the same procedure across the board.
Starting a Generator for the First Time (Brand New Generator)
A brand-new generator can be a challenge to start but the following steps make the work all the much easier. Follow each one as stated to avoid accidents or damage to the generator itself.

1. Check the generator’s manual for assembly
While the starting procedure for a generator is basically the same, consulting the manual to assemble the generator – if it wasn’t already assembled – is a major consideration. The manual will also help you identify which parts they are when we mention them in the rest of the guide.
2. Inspect for leaks and damage
Next, you check the generator for any damage done to the parts during transport or storage. Check especially for moving parts such as levers and switches. Also, check for any gas leaks which may occur due to torn pipes or loosely fitted seals.
If you find any issues that you can quickly fix, fix them before the next stage. Otherwise, if the damage to the generator is major such as broken lever or missing parts, you’ll need to contact the seller or manufacturer for replacement.
3. Move the generator outdoors
As a warning, never run any machinery that relies on fuel indoors. They generate a lot of carbon monoxide gas which can easily kill you in a few minutes. Being a colorless and odorless gas, you’re better off not turning on the generator in the house, shed or even garage. In fact, it’s recommended that the generator should be at least 15 feet away from the house.
While operating outdoors, always protect the generator from rain and sunlight since they’re a risk to the parts and operation of your machine. Water can cause the generator to short-circuit and even damage the engine. For this reason, you’ll need a generator tent which covers the generator and the surrounding area.
On the other hand, you may have already noticed that backup generators are kept in a shed with only one wall and the roof covered while the rest of the shed is covered with open material such as wire mesh. Such a shade is safe as long as it receives enough air circulation.
4. Check for oil and gas levels
For a new generator, it’ll likely not have any oil or gas unless you tried it at the shop. You’ll thus need to fuel it and add the right type of oil up to the recommended levels. Always aim to use fresh gas with your generator as the ethanol which is part of the gas will absorb water leading to the likelihood of the generator failing to start.
5. Disconnect cords from the generator
To prevent the risk of shock and other types of damage on any electronics connected to the generator, you should disconnect any power cords connected to your generator before attempting to start it. This holds true even for the subsequent times you’ll be starting the generator.
6. Turn the fuel valve on
Turn on the fuel valve by flipping the little lever on. As you do this, fuel will go to the carburetor where it’ll help start the generator.
7. Turn the choke on
If you’re facing the choke, turn the lever from your right to your left. It’ll likely be marked with ON and OFF signs and you’re supposed to make sure the lever is on the ON section.
8. Turn on the engine switch (ignition)
The engine switch, also called the main switch or the ignition, is what allows the engine to turn on. You have to turn it on before turning on the engine either with a recoil cord or start button.
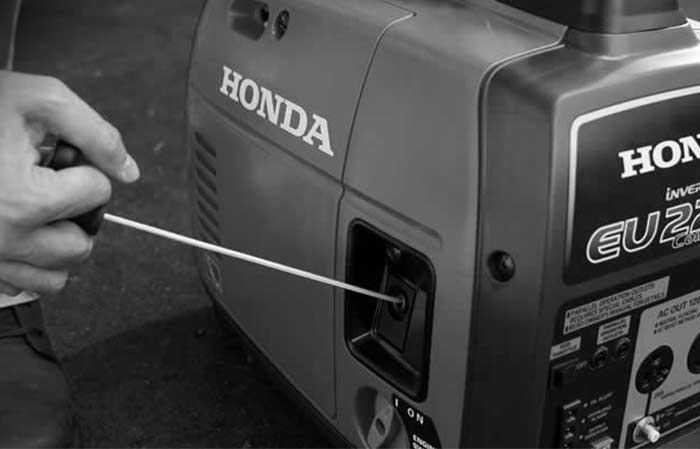
9. Start the generator with/without Pull Cord
You have the option of using the engine start switch or recoil cord to start the generator. In the case that your engine doesn’t start, it could be a low battery which will require charging before trying the process again. The steps for each procedure are as follows:

With pull cord
The pull cord is the T-shaped plastic jutting out of a circular hub usually with the name of the generator written on the hub. To start the generator with it, you have to pull the cord out until you feel some resistance then you let it go. Try again if the engine doesn’t start on the first trial.
If after about 3 trials the engine doesn’t still start, turn the choke to HALF RUN then try again. Make sure that the pull cord is pulled in an almost jerking motion rather than a slow one.
Without pull cord (with switch)
Turning the generator on with the switch is quite simple as it only entails turning the switch in a half turn in the clockwise direction.
If the pull cord has issues, and you want to do an emergency start, following is video with a working hack.
10. Move the choke to the RUN option
After the generator starts, turn the choke to the RUN option to keep it running smoothly. From here, it’ll run without an issue until you turn it off.
Always go through these steps even when you’re starting a generator for the subsequent time. After these steps, you can then connect the generator to your home to power supply.
The Do’s and Don’ts of Starting a Generator for the First Time
A new (or old) generator needs special care each time you use it. That way, you’ll avoid accidents and it’ll serve you for a long time. The practices to always have include the following:
The Do’s
- Plan ahead on the power you’ll need for a generator to avoid overworking it. The safest strategy is to have a generator that’s able to produce more power than you need. About 1.5 times the power you need is the best bet. This is because each time you add a new load to it you’ll be straining it to match up to the new power being used.
- Always have some extra fuel on hand to take care of emergencies. You never know how long the power outage in the storm may last.
- Practice caution when using the generator at all times. This includes refueling only after the generator has been shut off and cooled and refueling when there are no flames around.
- Keep the power cords in good condition. Check their actual power rating then always keep them properly insulated and grounded to reduce the risk of electric shock. Protect them from the sun and other harsh conditions as these reduce their lifetime. Each time you need to start the generator, always check the integrity of the cables beforehand.
- Always keep the manual at hand for when you’re tackling a problem you don’t know. This will save you lots of pain and costs.
The Don’ts
- Never use your generator indoors. Keeping at least 15 feet from any house is the best bet to avoiding suffocation from the carbon monoxide released by the generator. Also, any covering you use on the generator should have at least 4 feet of clearance from the generator.
- Never use your generator in a wet environment. This only increases the likelihood of electrocution and damage to the generator. As such, always keep it covered and off the ground.
- Don’t start the generator with the power cord to the home connected. This will likely damage your electronics due to a power surge. It’s better to wait until the engine sound stabilizes before plugging in the power cord.
Starting a Diesel Generator
Starting and stopping a diesel generator is a bit different from the petrol one. While some steps are similar to the petrol one, the following steps indicate that you’ll need a few more dedicated steps to get it running.
The steps are as follows:
- Start by checking whether the water tank is filled with water. If not, fill it with clean water. If it’s during the winter, check whether the anti-freeze is also full.
- Next, check the oil, fuel and radiator water levels. If any of them is below the needed level, top it up with the right fluid.
- As in the above steps, check all the switches and turn them to the required directions. These include the choke and others.
- You should then check whether the diesel emergency stop genset is in the correct position. It’s located on the dashboard of the generator.
- Check the genset preheating to make sure it’s the correct one. If the ambient temperature is 20°C or less, you should turn on the electric heater to heat up the whole generator to a temperature above this.
- Check for leakages and debris around the generator to eliminate any risk of shock, fire and general failure. The areas to check for debris include the exhaust port and the genset.
- Check the battery and the voltage and make sure they’re in the right state to start the generator. Also, check the alternator and the diesel engine circuit to ensure they’re normal and firmly fitted.
- Check the genset controller indicator light to make sure it’s normal.
- Discharge the air in the fuel system of the generator.
- Discharge the air in the oil filter as well.
- Release the emergency stop button then rotate it in a clockwise direction. Switch the control switch with your hand to the STOP setting.
- Start the generator.
These are easy steps to follow if you have the manual for your generator and the generator is in good condition.
Starting Various Generator Brands
While the generator starting procedure is almost the same for all generators, there could be a few differences as per the brand of the generator as shown in the following sections. The focus is on highlighting the main differences among the many generator brands as the rest of the procedures are the same.
1. Honda
For the Honda generators, there is a fuel tank lever which should be turned ON and the eco-throttle to OFF before starting it.
2. Generac
Generac generators have an ON/OFF switch on the hosing of the recoil housing to be turned on before starting.
3. Champion
Champion generators don’t have any special parts and will rely on the procedure above to work.
4. Briggs & Stratton
These too use the main procedure outlined above without special differences.
5. Energizer
Some Energizer generators have a physical key and a car-like remote key with which you can use instead of the switch. They still have the recoil cord as well.
6. DuroMax/DuroStar
DuroMax generators come with an orange shipping brace and cable tie with wooden support which must be removed before operating the generator. Other than that, the rest of the steps are the same as for the other generators.
7. Powermate
This type of generator also uses the same start procedure as the others.
8. Winco
Winco generators have no special steps or features different for the start procedure.
9.WEN
WEN generators use the outlined start procedure.
10. Westinghouse
The normal start procedure is used for these generators.
From this guide, it’s clear that you only need a single type of procedure to start any generator. In fact, the parts mentioned are usually labeled for ease of access and use.
More Generator How-tos & Hacks
- Generator Won’t Start (New & Used): Causes, Troubleshooting & Fixes
- Generator Pull Cord Won’t Retract: Causes & Fixes
- Generator Won’t Stay Running: Causes & Fixes
- Generator Running Rough & Not Smoothly-Causes + Fixes
- How to Connect /Hook Generator to House without Transfer Switch
- How to Change Oil in Generator-Step by Step
- How to Clean Generator Air Filter & Housing
- How to Fix an Overloaded Generator
- How to make a Generator Quiet as a Cricket for Camping
- 15+ ways to Secure Portable Generators from Theft & Damage
- Portable Generators Safety Tips Checklist